Sharing a project
One of the main features of Overleaf is the ability to share projects and collaborate on them with other users.
In Overleaf there are two options to share a project with collaborators: inviting those collaborators via email, or sharing an access link to the project, also known as “link sharing.”
Link sharing
“Link sharing” allows a project owner to share their projects via different types of link:
- View Link: Anyone with a view link can access and read the associated Overleaf project.
- Edit Link: Anyone with an edit link is allowed to edit the associated Overleaf project—if they already have an Overleaf account; otherwise, they'll need to create an account first. If the number of editors already in the project has reached the allowed limit, any user joining the project with an edit link will join with view-only permissions.
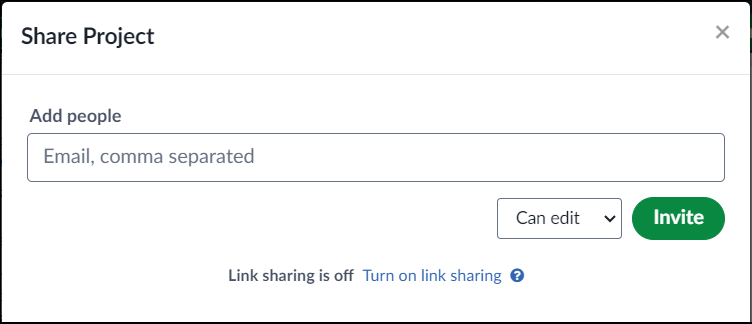
To access link sharing:
- Click on the Share button at the top right corner of the project:
- Click Turn on link sharing:
- The shareable edit and view URLs will be displayed:

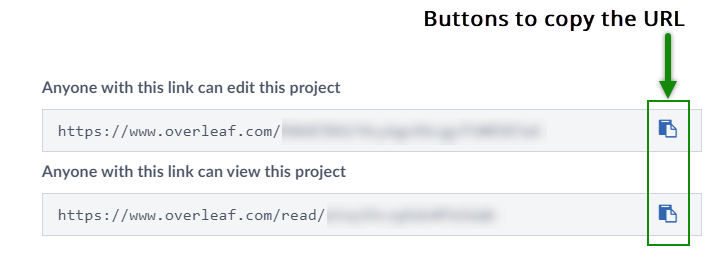
To let someone access the project, simply send them the appropriate URL. Note that users must have an Overleaf account to edit a link-shared project.
Inviting collaborators via email
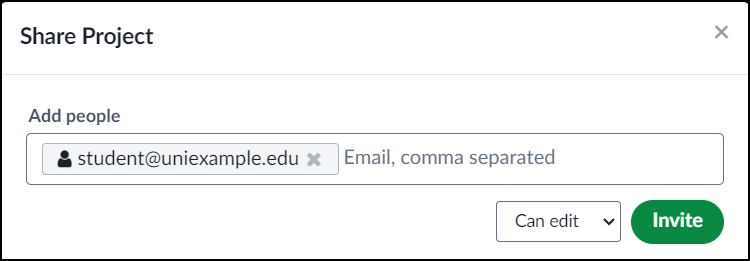
If you know the email address of your collaborators you can invite them to the project via email. To share a project with someone:
- Click on the Share button at the top right corner of the project:
- Enter the email address of the user you would like to share the project with:
- Choose whether you would like the collaborator to have view only access, or whether they will be allowed to edit the project.
- Click Invite.
Your collaborator will now receive an email inviting them to join the project. Once they have logged into their account, they will be able to accept the invite and collaborate on the project. The Share Project window will update to show that they have accepted the request and joined the project. If they do not receive an email:
- Make sure the email address you are using is correct.
- Try resending the email by clicking Resend in the Share Project window.
- Check the spam folder of the email address as sometimes emails can end up in there by mistake.
Number of collaborators allowed
Adding more than 1 collaborator per project is a premium feature. Overleaf premium features are available to users whose organization or university has an Overleaf Commons subscription, members of group subscriptions, and owners of individual subscriptions. The number of collaborators you are allowed to invite will depend on the plan you are part of. Visit our plans page to view the different plans available.
Overleaf guides
- Creating a document in Overleaf
- Uploading a project
- Copying a project
- Creating a project from a template
- Using the Overleaf project menu
- Including images in Overleaf
- Exporting your work from Overleaf
- Working offline in Overleaf
- Using Track Changes in Overleaf
- Using bibliographies in Overleaf
- Sharing your work with others
- Using the History feature
- Debugging Compilation timeout errors
- How-to guides
- Guide to Overleaf’s premium features
LaTeX Basics
- Creating your first LaTeX document
- Choosing a LaTeX Compiler
- Paragraphs and new lines
- Bold, italics and underlining
- Lists
- Errors
Mathematics
- Mathematical expressions
- Subscripts and superscripts
- Brackets and Parentheses
- Matrices
- Fractions and Binomials
- Aligning equations
- Operators
- Spacing in math mode
- Integrals, sums and limits
- Display style in math mode
- List of Greek letters and math symbols
- Mathematical fonts
- Using the Symbol Palette in Overleaf
Figures and tables
- Inserting Images
- Tables
- Positioning Images and Tables
- Lists of Tables and Figures
- Drawing Diagrams Directly in LaTeX
- TikZ package
References and Citations
- Bibliography management with bibtex
- Bibliography management with natbib
- Bibliography management with biblatex
- Bibtex bibliography styles
- Natbib bibliography styles
- Natbib citation styles
- Biblatex bibliography styles
- Biblatex citation styles
Languages
- Multilingual typesetting on Overleaf using polyglossia and fontspec
- Multilingual typesetting on Overleaf using babel and fontspec
- International language support
- Quotations and quotation marks
- Arabic
- Chinese
- French
- German
- Greek
- Italian
- Japanese
- Korean
- Portuguese
- Russian
- Spanish
Document structure
- Sections and chapters
- Table of contents
- Cross referencing sections, equations and floats
- Indices
- Glossaries
- Nomenclatures
- Management in a large project
- Multi-file LaTeX projects
- Hyperlinks
Formatting
- Lengths in LaTeX
- Headers and footers
- Page numbering
- Paragraph formatting
- Line breaks and blank spaces
- Text alignment
- Page size and margins
- Single sided and double sided documents
- Multiple columns
- Counters
- Code listing
- Code Highlighting with minted
- Using colours in LaTeX
- Footnotes
- Margin notes
Fonts
Presentations
Commands
Field specific
- Theorems and proofs
- Chemistry formulae
- Feynman diagrams
- Molecular orbital diagrams
- Chess notation
- Knitting patterns
- CircuiTikz package
- Pgfplots package
- Typesetting exams in LaTeX
- Knitr
- Attribute Value Matrices
Class files
- Understanding packages and class files
- List of packages and class files
- Writing your own package
- Writing your own class